
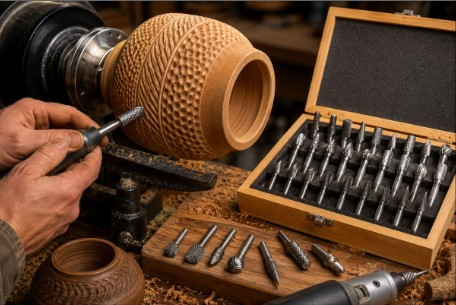
Woodturning is not limited to smooth curves and polished surfaces. Many turners use woodturning texturing to add patterns, tactile detail, contrast, and visual depth to turned pieces. Texturing can be used on bowls, boxes, finials, spindle work, handles, ornaments, and other decorative objects.
Texturing tools are commonly used to add surface decoration to turned work, and different tools can create spirals, chatter marks, stippled effects, bands, grooves, and patterned details. The technique is often used after shaping but before final finishing, because sanding and coloring can affect how the texture appears.
Texturing Adds Detail to Turned Wood
Woodturning texturing is the process of creating intentional surface patterns on a piece while it is still mounted on the lathe. Instead of leaving every surface smooth, the turner adds controlled marks to selected areas. These marks may be decorative, functional, or both.
Texture can highlight a rim, separate design zones, add grip to a handle, or make a simple form more visually interesting. It can also create shadow lines that make the piece look more dimensional. The key is to use texture with purpose rather than covering the whole piece without a design plan.
Different Tools Create Different Surface Effects
Several tools can be used for texturing. Some are hand-held tools designed specifically for the lathe, while others are small rotary tools used for carving and detailing. Each tool leaves a different surface character.
Common texturing tools include:
- Rotary texturing tools
- Spiraling tools
- Chatter tools
- Knurling-style tools
- Carbide burrs
- Rasps
- Small carving wheels
- Wire brushes
- Detail gouges
- Scrapers
A rotary texturing tool can add decoration quickly to turned wood, acrylic, antler, and similar materials, and different shaped cutters can be used on flat surfaces, beads, and coves.
Wood Species Affects Texture Results
Different woods respond differently to texturing. Hard, close-grained woods often hold crisp detail better than soft or open-grained woods. Soft woods may tear, fuzz, or compress if the tool is too aggressive.
Maple, cherry, walnut, boxwood, and other tighter-grained woods can show cleaner patterns. Oak, ash, and other open-grained woods may create more rugged texture. Test cuts on scrap from the same blank can help predict the final result.
Lathe Speed Influences Control
Lathe speed affects how the tool contacts the wood. A slower speed often gives more control when using texturing or spiraling tools. Too much speed can cause chatter, overheating, uneven marks, or loss of control.
Some spiraling and texturing systems are often used at slow lathe speeds, around 300 to 400 RPM depending on the tool, wood, and pattern goal. Other pattern texturing tools may also work well at slower speeds such as 500 RPM or less. Tool instructions should always be followed.
Placement Matters in the Design
Texture is usually most effective when placed intentionally. A narrow textured band can frame a lid, highlight the rim of a bowl, or separate two smooth surfaces. Using texture sparingly can make it stand out more.
Good locations include:
- Bowl rims
- Box lids
- Finials
- Beads and coves
- Handles
- Foot rings
- Ornament collars
- Spindle details
- Decorative bands
The texture should support the shape of the piece. If the form is simple, texture can add interest. If the form is already complex, too much texture may make the piece look busy.
Sanding Changes the Texture
Sanding can soften or remove fine texture. For this reason, many turners sand the area first, then apply the texture afterward. If the textured area needs cleaning, use light sanding or a soft abrasive carefully.
Some textures are meant to stay crisp. Others may look better slightly softened. The final decision depends on whether the piece should feel sharp, rustic, smooth, or tactile.
Color Can Highlight Patterns
Color, stain, dye, wax, or liming products can make texture more visible. Dark color in recesses and lighter color on raised areas can create contrast. This can make small patterns easier to see.
For example, a textured band may be dyed, burned, or filled with wax to make it stand out. The finish should match the use of the piece. Decorative objects allow more freedom, while functional items may need food-safe or durable finishes.
Safety Should Guide the Process
Texturing and rotary carving both create dust, small chips, and tool contact risks. Eye protection, respiratory protection, and dust collection are important. Loose clothing, jewelry, and gloves should be avoided near spinning work.
When using rotary tools, dust and noise are common concerns, and many woodcarvers recommend eye protection, hearing protection, respirators, and dust collection. Tool rests, cutters, and workholding should also be checked before starting.
Practice Improves Consistency
Texturing takes practice because tool angle, pressure, speed, and wood type all affect the result. A small change in angle can create a very different pattern. Practicing on scrap wood helps build control.
Useful practice steps include:
- Test on the same wood species
- Start with light pressure
- Use slow lathe speed
- Keep tool contact steady
- Mark texture zones before cutting
- Try different cutter angles
- Compare finishes on sample textures
- Keep notes for repeatable patterns
Consistent results come from repeating the same settings and tool movements.
Final Thoughts
Woodturning texturing is a useful way to add surface character, contrast, and tactile interest to turned wood. It can be applied subtly through small bands or more boldly through patterned rims, lids, handles, and decorative areas. When used in the middle of the finishing process, rotary carving tools for wood can expand the range of surface effects beyond the lathe. The best results come from testing, controlled speed, safe tool handling, and choosing textures that support the shape of the finished piece.